
概要
本記事ではSAML認証フローを用いてシングルサインオンを実現する流れをSalesforceのプラットフォームでの設定を用いて仕組みを整理します。
主な用語の内容は以下の通りになります。
Idp
Identity Provider。ユーザーのIDやパスワードなどの認証情報を提供する役割を果たす。
SP
Service Provider。IdPに認証を委託し、IdPによる認証情報を信頼してユーザーにサービスを提供する。OpenID Connectの場合には、RP (Relying Party) ともいう。
SAMLとは
SAMLは、Security Assertion Markup Languageの略であり、Webサービスベースのシングルサインオンプロトコルである。認証情報のやりとりなどにXMLを利用。企業向けの従来型のソフトウェア製品などで採用されているケースが多い。利用者先にIdpにアクセスするユースケース(Idp Initiated)と、先にSPにアクセスするユースケース(SP Initiated)の両方をサポートしている。
OpenID Connectとの使い分け
SAMLはOpenID Connectとは違いIdpとSPが直接通信を行う必要がないという点が一番大きな違いであるため、大体の使い分けは以下の通りになります。
- SAML・・・エンタープライズ向け
- OpenID Connect・・・コンシューマーサービス向け
SAMLフロー種類
Idp-Initiated
Idp-Initiatedフローは、Idp側が起点となるのでユーザがIdpのログイン画面等にアクセスする処理から始まり、認証を行った後にSAMLレスポンスに含むSAMLアサーションをSPで検証してログイン状態とします。

SP-Initiated
SP-Initiatedフローは、SP側が起点となり未ログインであった場合にはIdpへリダイレクトしてIdpで認証を行った後にSAMLレスポンスに含むSAMLアサーションをSPで検証してログイン状態とします。

SalesforceでのSAML
SalesforceでのSAML認証フローを用いたシングルサインオンの設定を確認していきます。
統合IDを設定する
シングルサインオンでログインするSalesforceのユーザに保持する統合IDを設定します。

SSOプロバイダを作成する
シングルサインオン設定で『SAMLを有効化』をチェックします。

SAMLシングルサインオン構成を作成します。

上記のシングルサインオン設定に対してIDプロバイダから返されるSAMLアサーションのサンプルは以下の通りとなります。
<?xml version="1.0" encoding="UTF-8"?>
<saml2p:Response xmlns:saml2p="urn:oasis:names:tc:SAML:2.0:protocol" xmlns:xs="http://www.w3.org/2001/XMLSchema" Destination="https://yoshiyukih-20200323-demo.my.salesforce.com" ID="_6367aa67-7bf3c8c0" IssueInstant="2021-03-21T13:50:36.804Z" Version="2.0">
<saml2:Issuer xmlns:saml2="urn:oasis:names:tc:SAML:2.0:assertion">http://axiomsso.herokuapp.com</saml2:Issuer>
<ds:Signature xmlns:ds="http://www.w3.org/2000/09/xmldsig#">
<ds:SignedInfo>
<ds:CanonicalizationMethod Algorithm="http://www.w3.org/2001/10/xml-exc-c14n#"/>
<ds:SignatureMethod Algorithm="http://www.w3.org/2000/09/xmldsig#dsa-sha1"/>
<ds:Reference URI="#_6367aa67-7bf3c8c0">
<ds:Transforms>
<ds:Transform Algorithm="http://www.w3.org/2000/09/xmldsig#enveloped-signature"/>
<ds:Transform Algorithm="http://www.w3.org/2001/10/xml-exc-c14n#">
<ec:InclusiveNamespaces xmlns:ec="http://www.w3.org/2001/10/xml-exc-c14n#" PrefixList="xs"/>
</ds:Transform>
</ds:Transforms>
<ds:DigestMethod Algorithm="http://www.w3.org/2000/09/xmldsig#sha1"/>
<ds:DigestValue>jDp/GDan46VCTki/ivVJ4S7FsA8=</ds:DigestValue>
</ds:Reference>
</ds:SignedInfo>
<ds:SignatureValue>QcZW4T0UX1uDNJfpXKPRAILl8IwiQQvFrg64BhEf2hJDQXiKoBBkPQ==</ds:SignatureValue>
<ds:KeyInfo>
<ds:X509Data>
・・・
</ds:X509Data>
</ds:KeyInfo>
</ds:Signature>
<saml2p:Status>
<saml2p:StatusCode Value="urn:oasis:names:tc:SAML:2.0:status:Success"/>
</saml2p:Status>
<saml2:Assertion xmlns:saml2="urn:oasis:names:tc:SAML:2.0:assertion" ID="_5d70ccab-1c94ddaf" IssueInstant="2021-03-21T13:50:36.804Z" Version="2.0">
<!-- 発行者(IDP)の情報 -->
<saml2:Issuer>http://axiomsso.herokuapp.com</saml2:Issuer>
<!-- Subjectに統合IDがセットされている -->
<saml2:Subject>
<saml2:NameID Format="urn:oasis:names:tc:SAML:1.1:nameid-format:unspecified">yoshiyukihayashi@yoshiyukihayashi-20200323.demo</saml2:NameID>
<saml2:SubjectConfirmation Method="urn:oasis:names:tc:SAML:2.0:cm:bearer">
<saml2:SubjectConfirmationData NotOnOrAfter="2021-03-21T13:51:36.804Z" Recipient="https://yoshiyukih-20200323-demo.my.salesforce.com"/>
</saml2:SubjectConfirmation>
</saml2:Subject>
<saml2:Conditions NotBefore="2021-03-21T13:50:36.804Z" NotOnOrAfter="2021-03-21T13:51:36.804Z">
<saml2:AudienceRestriction>
<saml2:Audience>https://saml.salesforce.com</saml2:Audience>
</saml2:AudienceRestriction>
</saml2:Conditions>
<saml2:AuthnStatement AuthnInstant="2021-03-21T13:50:36.804Z">
<saml2:AuthnContext>
<saml2:AuthnContextClassRef>urn:oasis:names:tc:SAML:2.0:ac:classes:unspecified</saml2:AuthnContextClassRef>
</saml2:AuthnContext>
</saml2:AuthnStatement>
<saml2:AttributeStatement>
<saml2:Attribute Name="ssoStartPage" NameFormat="urn:oasis:names:tc:SAML:2.0:attrname-format:unspecified">
<saml2:AttributeValue xmlns:xsi="http://www.w3.org/2001/XMLSchema-instance" xsi:type="xs:string">http://axiomsso.herokuapp.com/RequestSamlResponse.action</saml2:AttributeValue>
</saml2:Attribute>
<saml2:Attribute Name="logoutURL" NameFormat="urn:oasis:names:tc:SAML:2.0:attrname-format:unspecified">
<saml2:AttributeValue xmlns:xsi="http://www.w3.org/2001/XMLSchema-instance" xsi:type="xs:string"/>
</saml2:Attribute>
</saml2:AttributeStatement>
</saml2:Assertion>
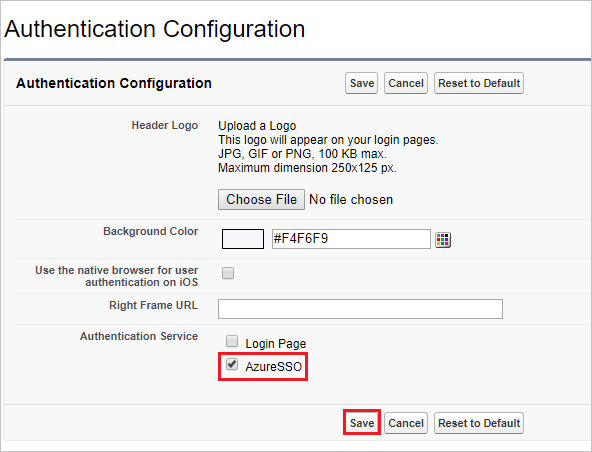
</saml2p:Response>Salesforceのログイン画面へIDPを追加
[私のドメイン]の認証設定で上記のIDPを認証サービスとして選択することで、IDPのログイン画面へリダイレクトさせることができるようになります。
参考
内部ユーザのシングルサインオンの設定
https://trailhead.salesforce.com/ja/content/learn/modules/identity_login/identity_login_sso
SAML シングルサインオンを使用するサービスプロバイダとして Salesforce を設定
https://help.salesforce.com/articleView?id=sf.sso_saml.htm&type=5
[私のドメイン] ログインページへの ID プロバイダの追加
https://help.salesforce.com/articleView?id=sf.domain_name_login_id_prov.htm&type=5